

Mold thrives on moisture. To keep your home mold-free, focus on controlling indoor humidity and addressing water issues immediately. Mold can grow within 24–48 hours of exposure to damp conditions, posing risks to your home’s structure and your health. Here’s what you need to know:
- Ideal Humidity Levels: Keep indoor humidity between 30% and 50%. Above 60%, mold, dust mites, and condensation can become problems.
- Common Moisture Sources: Leaks, condensation, poor ventilation, and everyday activities like cooking and showering.
- Problem Areas: Basements, bathrooms, kitchens, crawl spaces, attics, windows, and exterior walls are hotspots for moisture buildup.
- Quick Fixes: Repair leaks, seal gaps, insulate pipes, and ensure proper ventilation.
- Prevention Tools: Use hygrometers to monitor humidity, dehumidifiers to reduce moisture, and exhaust fans to improve airflow.
- Exterior Solutions: Maintain gutters, slope soil away from your home, and waterproof basements or crawl spaces.
Key takeaway: Mold prevention starts with moisture control. Act fast to address water issues, monitor humidity, and maintain proper ventilation to protect your home and health.
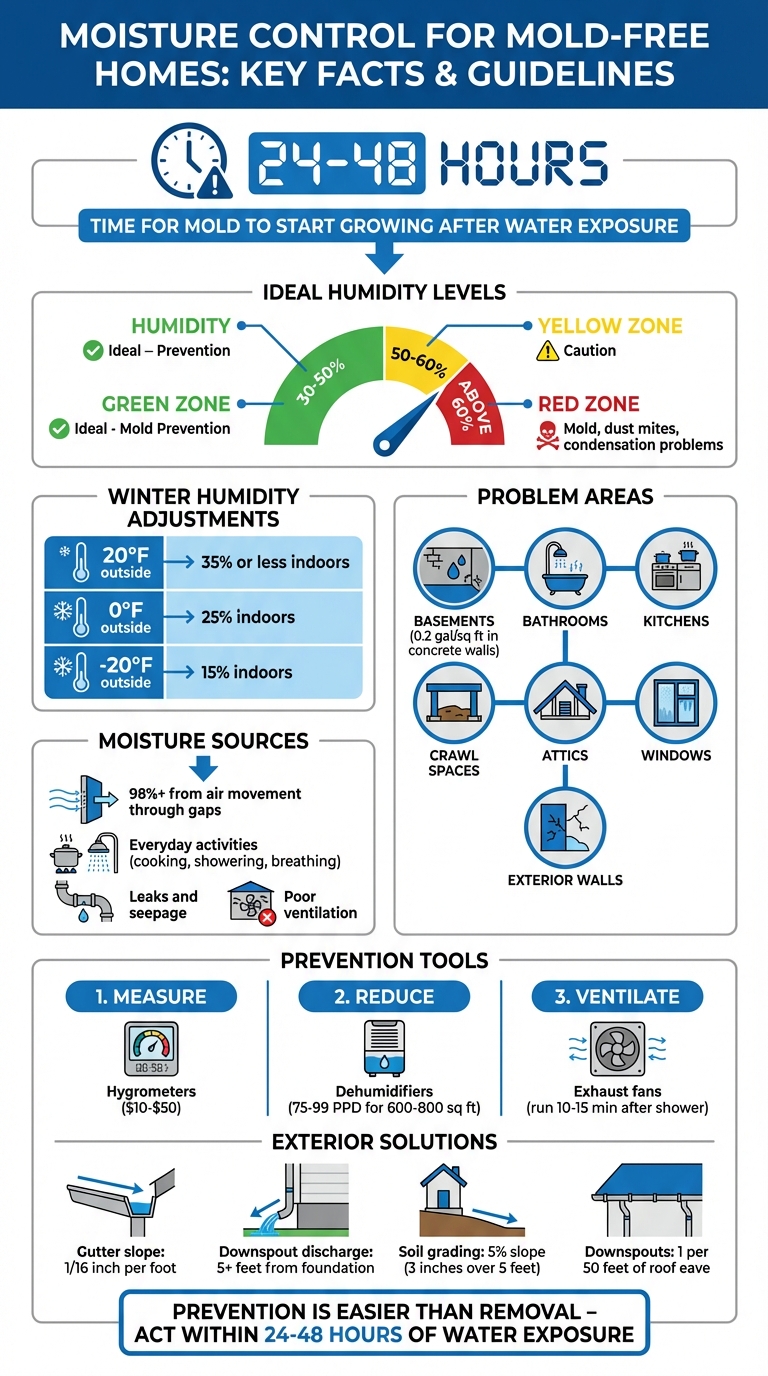
Ideal Home Humidity Levels and Mold Prevention Guide
How to Stop Damp Mould & Condensation – a COMPLETE Guide
sbb-itb-401327a
How Moisture and Mold Growth Are Connected
Mold spores are everywhere – both inside and outside your home – but they need moisture to grow. Once these spores land on a damp surface, they can start growing within just 24–48 hours. Without moisture, mold simply can’t thrive. That’s why managing humidity and addressing water issues are key to keeping mold at bay. This makes indoor humidity control a top priority.
Why Indoor Humidity Levels Matter
Your home’s relative humidity is a crucial factor in mold prevention. When humidity rises above 60%, condensation can form on cold surfaces like windows, pipes, and exterior walls. These damp spots create the perfect conditions for mold to grow.
Kevin Dickson, President of Energy Services Air Conditioning, Heating and Electrical, sums it up well:
"When humidity is too high, the air can feel sticky and uncomfortable, and the excess moisture creates a breeding ground for mold, mildew, and dust mites".
In winter, maintaining lower indoor humidity is especially important. For example, when outdoor temperatures drop to 0°F, indoor humidity should stay at or below 25% to avoid condensation on cold surfaces. This is because warm indoor air holds more moisture, which can condense into water droplets when it contacts cold surfaces – creating ideal conditions for mold.
Understanding this relationship helps pinpoint where indoor moisture comes from.
Where Indoor Moisture Comes From
Moisture in your home comes from two main sources: liquid water from leaks and seepage, and water vapor from daily activities and poor ventilation. Everyday actions like cooking, showering, breathing, and even having indoor plants or stored firewood add moisture to the air. Unvented combustion appliances also contribute.
However, the biggest culprit is water vapor sneaking in through tiny gaps. Air movement is responsible for over 98% of the water vapor that enters building cavities. Small cracks around windows, gaps in the building’s structure, and unsealed openings allow humid outdoor air to infiltrate, where it condenses on cold surfaces.
Basements and crawl spaces pose additional challenges. Porous materials like concrete and wood can draw moisture from the ground through capillary action, pulling it into your home. Plumbing leaks around sinks, tubs, and toilets also create localized wet areas that encourage mold growth.
Finding and Fixing Moisture Problem Areas
Understanding where moisture tends to collect and spotting it early can save you from costly mold removal down the line. Moisture issues often follow predictable patterns, showing up in specific areas of your home.
Where Moisture Problems Occur Most Often
Basements are prime candidates for moisture troubles due to constant underground water pressure. Hydrostatic forces push water through porous concrete, while capillary suction can pull moisture upward through clay soil – sometimes as high as 20 feet. To put it into perspective, new concrete can hold about 0.2 gallons of water per square foot of wall and 0.1 gallons per square foot of floor.
Bathrooms and kitchens are other hotspots, as everyday activities like showering, cooking, and dishwashing generate significant moisture. Crawl spaces also face challenges due to damp soil and the "stack effect", which draws moist air upward through cracks into your living spaces. Attics can trap moisture when warm, humid air seeps through ceiling gaps or when roof leaks occur. Windows and cold surfaces often become condensation magnets when their temperatures drop below the surrounding air’s dew point. Exterior walls can also experience moisture issues from wind-driven rain and air infiltration.
Recognizing these common patterns is the first step in tackling moisture problems.
How to Recognize Moisture Problems
Once you know where moisture tends to gather, it’s crucial to identify early warning signs.
A musty smell can be a telltale sign of hidden mold growth, even if you don’t see visible water. Other clues include peeling paint, blistered surfaces, or cracking drywall tape. Rust on metal pipes or floor drains, as well as water droplets on windows or cold pipes, often signal high humidity or active condensation. Be sure to check less obvious spots, such as behind drywall or wallpaper, on ceiling tiles, under carpets, and inside wall cavities. White, powdery deposits (efflorescence) on concrete or masonry are another indicator that water is moving through your foundation.
Spotting these signs early can help you address problems before they escalate.
Simple Repairs for Common Moisture Issues
Once you identify a moisture issue, taking quick action can make a big difference. Here are some practical fixes:
- Repair plumbing leaks immediately, as mold can start growing within 24 to 48 hours of water exposure.
- Seal air leaks around windows, doors, and structural gaps to limit water vapor intrusion.
- Insulate cold water pipes to prevent condensation and dripping.
For larger structural concerns, ensure the soil around your home slopes away from the foundation – at least 1 inch per foot for 6 feet. Install one downspout for every 50 feet of roof eave, extending the discharge at least 4 feet away from your walls. In crawl spaces, cover dirt floors with a 6-mil polyethylene vapor barrier, overlapping seams by 12 inches and securing them with tape.
To prevent moisture buildup in other areas, use vented exhaust fans and ensure proper air circulation near exterior walls to avoid condensation on cold surfaces. If you rely on a sump pump, make sure the pit has an airtight, childproof cover to stop moist air from escaping into your home.
Tools and Methods for Controlling Moisture
Once you’ve pinpointed areas prone to moisture, the next step is managing indoor humidity. Keeping humidity levels between 30% and 50% relative humidity is key to discouraging mold growth. Here’s how to measure and control your home’s humidity effectively.
Measuring Humidity with Hygrometers and Smart Monitors
To manage humidity, you first need to measure it. Hygrometers, also called humidity meters, provide instant readings of a room’s relative humidity. These devices are affordable, typically costing between $10 and $50. For a more hands-off approach, many HVAC systems, humidifiers, and dehumidifiers come with humidistats that automatically adjust to your desired humidity level.
For the most accurate readings, place your hygrometer near cold surfaces like windows, basement walls, or closet corners – areas where condensation is likely to show up first. Avoid placing it near heat sources, air conditioners, or steam-producing appliances, as these can distort readings. Don’t forget to measure hidden spaces like crawlspaces and attics, where moisture issues often begin.
Humidity targets can vary by season. In winter, keep levels lower to avoid condensation on cold surfaces. For example:
- At 20°F outside, aim for indoor humidity of 35% or less.
- At 0°F, reduce it to around 25%.
- In extreme cold, such as –20°F, keep it near 15%.
If you notice moisture on windows, it’s a sign your humidistat may be set too high and needs adjustment.
Reducing Moisture with Dehumidifiers and Air Conditioners
In warm, humid climates, dehumidifiers and air conditioners are essential for removing excess moisture. However, air conditioners need to run long enough to dehumidify effectively, not just cool the air. For situations like water damage, pairing a dehumidifier with three or four high-speed fans can speed up moisture removal. The fans push moisture out of surfaces and into the air, where the dehumidifier can capture it.
When selecting a dehumidifier, check its Pints Per Day (PPD) rating. For spaces around 600 to 800 square feet, a unit rated for 75 to 99 PPD should work. Larger areas may need a unit rated at 100+ PPD, or even multiple units. When using fans, direct them toward wet surfaces rather than at each other to ensure proper evaporation.
Regular upkeep is vital. Clean drip pans and drain lines frequently to prevent mold buildup. Replace filters often and inspect the surrounding area for leaks or signs of dampness.
Improving Ventilation and Air Circulation
Good airflow plays a big role in controlling moisture. In high-humidity areas like bathrooms and kitchens, ensure exhaust fans vent directly outdoors. Running bathroom fans during showers and for 10 to 15 minutes afterward helps clear out steam. Similarly, always vent your clothes dryer outside to avoid adding extra moisture to your home.
Keep interior doors open to encourage airflow, particularly in cooler spaces like closets. Rearranging furniture to avoid blocking wall corners can help prevent cold spots where moisture might condense. You can also boost airflow by opening drapes, using register booster fans, or briefly opening windows when outdoor humidity is below 50%.
In attics, proper ventilation is key. Use soffit vents (at the roof’s edge) and ridge vents (at the peak) to promote airflow. Avoid powered attic fans, as they can pull conditioned air from your living areas, increasing energy costs. For crawlspaces, install vents near the corners of the foundation, positioned within the top 8 inches.
Exterior Solutions for Preventing Moisture
Keeping indoor humidity in check is only part of the battle against mold. To truly protect your home, you need to stop moisture from entering in the first place. Once water gets inside, managing the damage becomes much harder. Consider this: just a few inches of rain can produce thousands of gallons of runoff. Without proper drainage, that water can saturate the soil around your foundation and eventually seep into your home.
Maintaining Gutters and Improving Drainage
Your gutters play a major role in protecting your home from water damage. To function properly, they need to slope at least 1/16 inch per foot toward the downspouts. For every 100 square feet of roof area, you’ll need 1 square inch of downspout cross-section, and downspouts should be spaced every 20 to 50 feet.
Where the water discharges is just as important. Downspouts should empty at least 5 feet away from your foundation if draining above ground, or at least 10 feet away if connected to an underground system. The lateral piping at the end of the downspouts should have a minimum slope of 5/8-inch per foot (a 5% grade) to keep water flowing. To avoid soil erosion, place splash blocks at the discharge points.
Regular maintenance is key. Clean your gutters and downspouts at least twice a year, especially before winter, to remove leaves and debris. Installing leaf guards can cut down on maintenance and keep pests at bay. If your roof eave meets a vertical wall, adding kick-out diverter flashing can direct water into the gutter instead of letting it seep behind your siding. In colder regions where ice dams are a concern, consider using grade-level rock beds with waterproof liners and drain pipes instead of traditional gutters.
Beyond gutters, the ground around your foundation needs proper grading. The soil should slope away from your home at a minimum 5% grade – about 3 inches of drop over 5 feet – for at least 5 to 10 feet. This prevents water from pooling near the foundation or being absorbed into the masonry.
Waterproofing Basements and Crawl Spaces
Even with a perfectly maintained gutter system and proper grading, moisture can still find its way into your home. Basements and crawl spaces are particularly vulnerable, as water can enter through hydrostatic pressure, capillary action, or air movement.
For crawl spaces, encapsulation is one of the most effective solutions. Cover the entire floor with 6-mil to 10-mil polyethylene sheeting, overlapping seams by 12 inches, taping them securely, and extending the plastic 6 inches up the foundation walls. This creates a barrier that helps stabilize temperatures and prevents wood rot.
Foundation drains are another critical component. A perforated 4-inch plastic pipe, installed next to the footing and surrounded by gravel wrapped in filter fabric, can help relieve hydrostatic pressure. The drain should direct water to a downhill location or a working sump pump. To further protect your foundation, use drainage mats or high-density fiberglass as a drainage plane over damp-proofed walls, channeling water down to the drain.
Adding a capillary break between the foundation and sill plate – using materials like rubberized roofing or sill gaskets – can prevent water from wicking into the wood framing. For cold water pipes in basements or crawl spaces, insulating them can stop condensation from forming and dripping onto surfaces.
Finally, remember that installing exterior drainage during construction is far cheaper than fixing issues later. Retrofitting can cost thousands – or even tens of thousands – of dollars. By contrast, an air gap membrane during construction costs around 50¢ per square foot, or about $500 for a 1,200-square-foot home.
Working with Professional Mold Remediation Services
When to Call a Professional
Handling small mold spots on your own is usually fine, but when the affected area is larger than 10 square feet or involves contaminated water, it’s time to bring in professionals. If the mold is caused by sewage or other polluted water sources, hiring certified experts in black water remediation is crucial to protect your family from dangerous pathogens.
For mold in HVAC ducts, act quickly. Shut off the system immediately to prevent spores from spreading. The EPA emphasizes:
"If you suspect that the heating/ventilation/air conditioning (HVAC) system may be contaminated with mold… do not run the HVAC system… it could spread mold throughout the building."
Sometimes, extensive or hidden mold growth requires professional attention to effectively control moisture and eliminate the problem.
Services Offered by Old World Restoration and Carpet Cleaning

When tackling mold becomes too much for DIY methods, professional remediation provides a thorough approach. Old World Restoration and Carpet Cleaning, a family-owned business serving Colorado Springs since 1977, specializes in IICRC-certified mold remediation, including black mold removal and targeted solutions for attics, basements, bathrooms, and crawl spaces.
The company uses advanced tools like thermal imaging and moisture detectors to pinpoint water sources that are often overlooked. By employing industrial-grade dehumidifiers and proven structural drying techniques, they address the root causes of mold rather than just treating visible growth.
Their services include mold removal, repairing damaged materials, applying antimicrobial treatments, and improving ventilation to prevent future issues. They also offer 24/7 emergency response in areas like Colorado Springs, Pueblo, Black Forest, Monument, Manitou Springs, and Fort Carson. Plus, their work is insurance-approved, making the process smoother for homeowners. For same-day assistance or more details, visit oldworldrestorationandcarpetcleaning.com.
Conclusion
To stop mold in its tracks, you need to stop moisture. Mold can only grow when moisture is present, so keeping indoor humidity levels between 30% and 50% is key to prevention. Addressing leaks immediately and ensuring proper ventilation removes the conditions mold thrives on.
Preventing mold is far easier – and cheaper – than dealing with its aftermath. Pamela Turner, a Professor and Extension Housing & Indoor Environment Specialist at the University of Georgia, emphasizes this point:
"Preventing mold in your home is easier than removing it".
Timing is critical when water exposure occurs. Drying out affected areas within 24 to 48 hours is essential to prevent mold growth.
Beyond prevention, regular checks can help you catch problems early. Use a hygrometer (available for $10–$50) to monitor humidity levels, and stay on top of routine maintenance like clearing gutters, insulating pipes, and maintaining exhaust fans. These steps protect both your health and your home’s structure. If these efforts aren’t enough, it’s time for further action.
The EPA offers a clear warning: "If you clean up the mold, but don’t fix the water problem, then, most likely, the mold problem will come back". For larger-scale issues – such as mold covering more than 10 square feet, contamination from dirty water, or HVAC system involvement – professional help is essential. Companies like Old World Restoration and Carpet Cleaning, certified by the IICRC, provide expert remediation in Colorado Springs and nearby areas.
FAQs
What’s the best way to monitor and manage indoor humidity to prevent mold?
To keep your home free of mold, start by keeping an eye on indoor humidity levels with a hygrometer. The goal is to keep relative humidity below 50%, as anything higher can promote mold growth.
To control humidity, make use of exhaust fans in the kitchen and bathroom to eliminate moisture from cooking or showering. In damp spaces like basements, dehumidifiers can be a big help. Don’t forget to address leaks right away, seal windows, and add insulation to surfaces prone to condensation. These simple steps can go a long way in maintaining a healthier, mold-free living space.
How can I prevent moisture buildup in basements and crawl spaces?
To keep moisture out of your basement, the first step is tackling water intrusion issues. Repair any leaks, ensure water drains away from your home, and fix damaged gutters. Sealing cracks around windows, vents, and walls, along with waterproofing the foundation, can also make a big difference. For extra protection, think about adding a vapor barrier and ensuring the area is well-ventilated.
In crawl spaces, aim to maintain humidity levels between 45% and 55% to prevent mold and wood rot. You can achieve this by sealing vents, installing vapor barriers, and using a dehumidifier if necessary. Encapsulation with moisture-resistant materials is another solid option – it not only keeps external moisture out but also helps protect pipes from freezing during colder months. Regular inspections and sealing efforts are essential for keeping both basements and crawl spaces dry and free of mold.
When is it time to call a professional for mold removal?
If mold covers a large area, keeps coming back despite your cleaning efforts, or is hiding in tricky spots like behind walls or under flooring, it’s time to call a professional. Mold isn’t just an eyesore – it can affect your health and even damage your home’s structure. Acting quickly is key to tackling the issue effectively.
When you’re unsure about the right way to handle the cleanup or worried about safety, a professional brings the expertise needed to remove the mold properly and stop it from returning. Relying on a certified expert helps keep your home safe, healthy, and free from mold.


